
Over the past couple of months, I have been creating email templates using the new(ish) email template syntax in Marketo and I’ve learned a couple tricks along the way. To save you from some headaches, here are 8 tips that I’ve learned from creating Marketo 2.0 email templates from scratch.
1. Complete rendering testing first
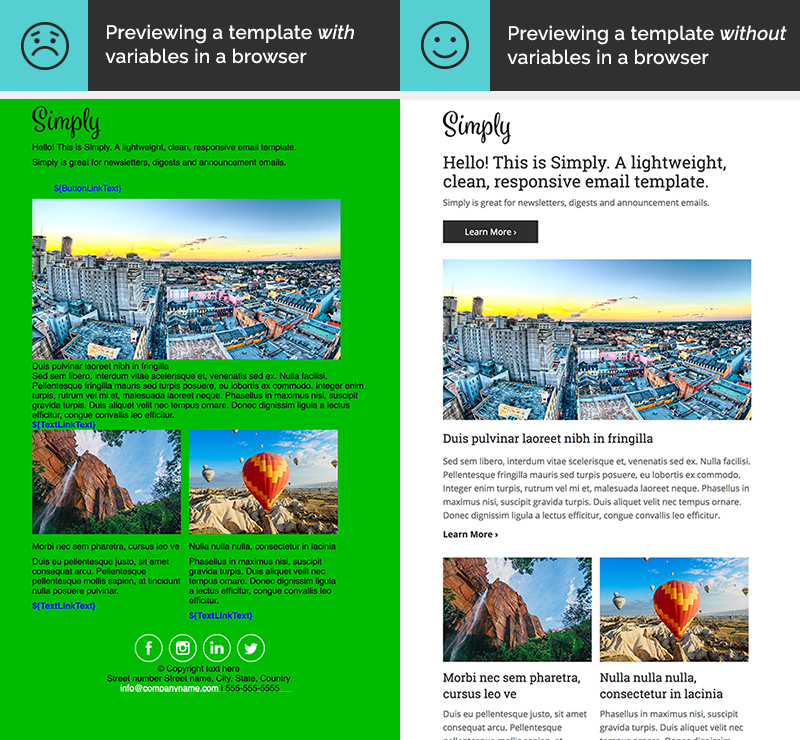
Before you turn your email template into a Marketo 2.0 email friendly version, make sure your email renders correctly on all devices first. Once you start adding Marketo-specific code, such as variables, it becomes more difficult to test your email template by previewing it in your browser or in an email rendering tool.
2. Map out the sections
Take the time to plan out what sections should be modules, color pickers, etc, should be in your template.

3. Understand global vs local variables
Creating global variables will allow all modules that use that variable to be updated. Creating local variables will allow each individual module to have a different value. So, for example, let’s say you have 2 call-to-action buttons in your email and you want to be able to update the background color of the buttons using a color picker variable. You can set it to be global, meaning when you use the color picker it will update BOTH buttons in the email or you can set it to be local, meaning the 2 buttons can be different colors.
Global variable example:
<meta class="mktoColor" id="ButtonBackgroundColor" mktoModuleScope="false" mktoname="Button Background Color" default="#2f2f2f" />
Local variable example:
<meta class="mktoColor" id="ButtonBackgroundColor" mktoModuleScope="true" mktoname="Button Background Color" default="#2f2f2f" />
4. Test along the way and get to know the error messages
When you copy and paste your template HTML into Marketo, you will receive an error message if your syntax is incorrect. If you have never created Marketo 2.0 email templates before, I suggest you try uploading the HTML at a couple points in your development process. For example, I usually add all the modules first and then upload the code to Marketo and try to approve it. If any of my modules are invalid then I will receive an error message.
So, what are common error messages and how do you fix them? Here are some that I’ve come across.
Error: Invalid Module

The issue
Containers can only contain modules and no other elements. So, if you receive this error it means there’s an HTML element in the container that isn’t a module.
The fix
You can create the element as a module or find the HTML and remove it, but finding the offending element can be a bit tricky, so here’s a tip.
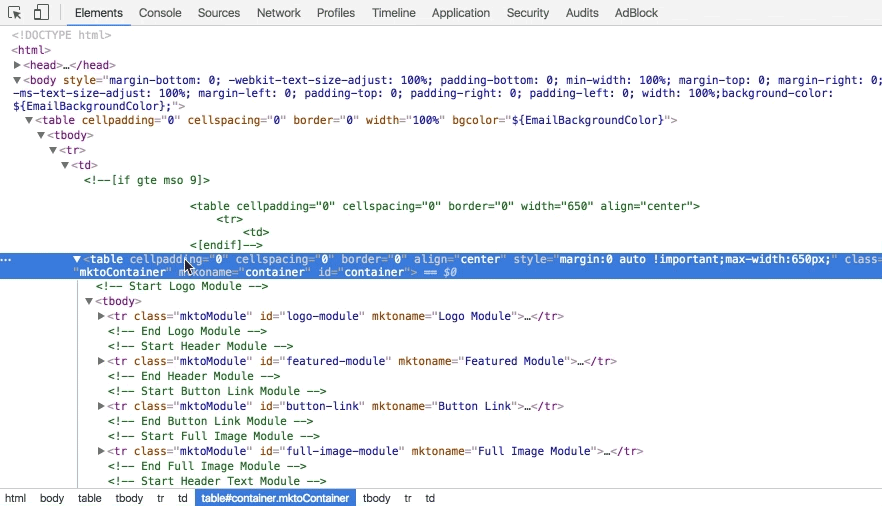
Open your email template HTML in Chrome and activate Developer Tools. Under the elements tab find your container (mktoContainer) element and make sure everything under that has a class of mktoModule. If there’s an element with now mktoModule present, like the example below, then it needs to be removed or turned into a module.
Error: No variable with this id declared

The issue
You’re trying to reference a variable that doesn’t exist.
The fix
Declare the variable within the HEAD section of you email template or double check that the variable is not misspelled. Remember these are case sensitive.
5. Modifications to a template might not update the email
When you make an update to the email template your changes might not be reflected in any emails that are currently using the template. This happens when you edit any content within a module. To view your changes delete the module from the email and drag-and-drop it back in. Any updates to elements other than modules should update in your email automatically once the template is approved.
6. Use a ‘list’ instead of a color picker
Adding a color picker to an email template opens up endless possibilities of the colors your users can choose when creating an email. The color picker syntax doesn’t have the option to restrict the color picker element to only your brand’s colors, so instead, you can use a list element to define your brand’s colors.
<meta class="mktoList" id="button-background-color" mktoName="Button Background Color" values="#233142,#455D7A,#F95959,#3BB4C1">
7. Create global variables for your UTM parameters
You can create global variables to append UTM tracking to all the links in your email.
<meta class="mktoString" id="utm-source" mktoModuleScope="false" mktoName="UTM Source=" default="">
<meta class="mktoString" id="utm-content" mktoModuleScope="false" mktoName="UTM Content=" default="">
<meta class="mktoString" id="utm-medium" mktoModuleScope="false" mktoName="UTM Medium=" default="">
<a href="${cta-url}?utm_source=${utm-source}&utm_content=${utm-content}&utm_medium=${utm-medium}">CTA TEXT</a>
8. Variables don’t automatically copy over to the text version
Unfortunately, variables don’t automatically copy over to the text version of a 2.0 email. So, if you have links or text defined as a variable you will need to manually add it to the text version of the email. You can also use MailChimp’s HTML to Text Email Converter to generate a text version of your email, without the manual work.
Vote for this idea on the Marketo Community
Have questions or tips you want to share?
Send them to me via email, send me a tweet @jennamolby, or leave a comment